
west michigan technology services
We Build Lasting IT Partnerships with Businesses in Michigan


We’re Too Busy Fixing IT to Brag About It...
Luckily, Our Clients Do the Talking for Us!
They Go Above and Beyond
“Devon is one of a kind! He is very responsive and always makes sure that everything is fixed and running before he leaves! He goes above and beyond with his customer service and explains everything he's doing. (...)The guys over at WMTS are fabulous and I highly recommend!”

JOSE VICSRIO
Michigan
West Michigan Glass Block
Friendly and Accommodating
“Highly Recommend the crew @ WMTS for ALL your computer needs. Their staff is Very Friendly and Accommodating and they work quickly to resolve any technical issue you may be experiencing. They are a vast storehouse of knowledge when it comes to ALL things technology focused. (...)”

VALERIE YOUNG
Michigan
Exceptional Service
“Incredible customer service. They make this company of 2 people feel like a top client. WMTS comes up with hardware and software solutions for our business, preparing for possible scenarios and challenges that may come up. Thanks Rick & Tom for being the IT Team for our business!”

JULIE GREEN
Michigan
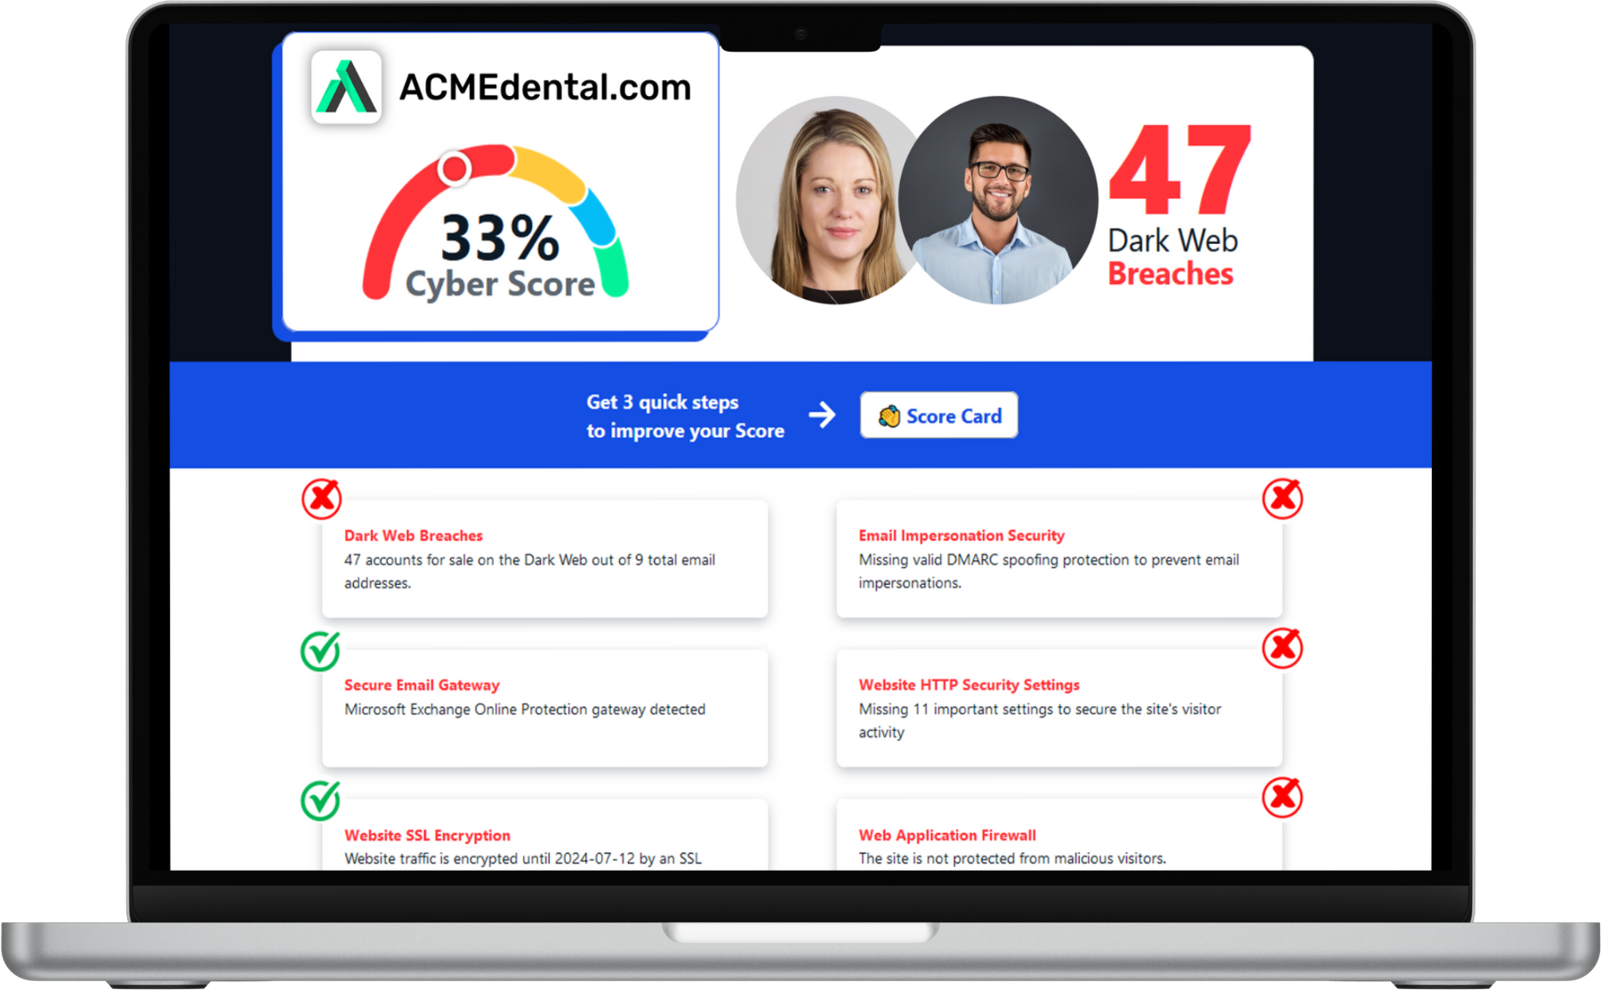
Think you're secure? Get your Cyber Security Score!
Get it in 30 seconds!
Enter Your Website URL to Get Your Cyber Score Right Now:
Your Security Matters—We’ve Got It Covered
Cybersecurity is no joke, but that doesn’t mean it has to be stressful. We keep your business secure so you can focus on what matters.
When You Have Security-First IT
Proactive Protection, No Surprises
We stay ahead of cyber threats, implementing layered security that stops problems before they start, so you’re never caught off guard.
Real-World Solutions, Not Scare Tactics
Security is about smart planning. We design protection that fits your business without overcomplicating things or breaking the bank.
Seamless Security, Zero Hassles
Strong security shouldn’t slow you down. Our solutions run in the background, keeping you safe without interrupting your workday.
Trustworthy Advice, No Tech Jargon
We make cybersecurity easy to understand. No confusing buzzwords, just straight talk and real solutions that actually work for you.
When You Don’t Have Security-First IT
Outdated Systems, Easy Targets
Ignoring security updates is like leaving your doors unlocked. Hackers love outdated systems—don’t make their job easy.
Fear-Driven Overcomplication
Some IT companies push unnecessary tools just to make a sale. We focus on what you actually need, not what they want to sell.
Inconvenient Security Roadblocks
Ever had security that makes work harder? That’s a fail. Security should protect you, not slow you down at every turn.
Confusing Advice, Costly Mistakes
If your IT provider leaves you guessing about security, you could be one misstep away from a costly data breach.
Making IT Security the Priority, Not an Afterthought
The West Michigan Technology Services Approach
Relationships Built to Last
We don’t just fix IT issues—we provide outsourced IT support and build long-term partnerships. Our first clients are still with us because we prioritize trust, reliability, and IT services that truly support their business.
No-Nonsense IT
Tech should be simple, not a headache. With outsourced IT support, we cut through the jargon, offer clear solutions, and ensure you get exactly what you need—no upselling, no unnecessary extras, just results.
vCIO Services That Deliver
We go beyond fixing problems—we help you plan for the future. Our vCIO services align your technology with your business goals, ensuring smart, strategic decisions that drive success.
Fun, But Always Professional
We love what we do, and it shows. Our team delivers outsourced IT support with a friendly, approachable style—keeping your business running strong without the IT stress.
Why West Michigan Technology Services
Cybersecurity is no joke, but that doesn’t mean it has to be stressful. We keep your business secure so you can focus on what matters.
Our Core Values
At the core of everything we do is a simple belief: IT should be honest, helpful, and human. From day one, we've focused on earning trust, building long-term relationships, and providing no-nonsense support that actually helps businesses grow.
WMTS Core Values
Our core values are the non-negotiable principles that guide everything we do here at WMTS. We expect our team to live by these values in all interactions, and we are confident that our clients will see these values in action
Integrity
Integrity means sticking to strong morals even when tempted to cut corners when no one is looking. You can count on us to always be honest and make recommendations that truly benefit you, not just make a sale. Trust is at the foundation of our relationships. We may not have yours just yet, but we will earn it. (Integrity – Upholding honesty and ethicality in everything we do.)
Gratitude
There are many other MSP options around, and we’re deeply grateful whenever someone chooses us. We’ll do our best to show our appreciation through top-notch service and support. (Gratitude –Genuine appreciation for every client who chooses us.)
Humility
Technology can be confusing and frustrating! We’ll always approach your issues with patience and understanding. We aim to provide the kind caring service we would want ourselves. (Humility -Meeting every client with patience and care.)
Loyalty
We believe in building long-term relationships founded on trust. We’ll stay loyal to our clients as long as it doesn’t compromise our integrity. (Loyalty – Building trust through long-term, honest, & ethical relationships.)
Growth
This business moves fast! Learning and improving daily is crucial to keep up. We prioritize constant professional and personal growth so we can deliver our best to you. (Growth –Constantly improving to better serve you.)
Our core values define our business. We uphold integrity, express gratitude, lead with humility, embrace loyalty, and pursue growth each day. This guides every single one of our interactions and services. Let us know if you have any questions! We look forward to working with you.
Ready for IT Support That Actually Cares About You?
Here are Three Ways We Can Help:
01
Find out how secure you really are
02
Sign Up For Our Cybersecurity newsletter
Learn How A Security-First IT Strategy Benefits Your Company:
03
ask us anything
Have a Question About Cybersecurity? We Have The Answers You're Looking For.
We’re happy to advise on anything cybersecurity-related, with no strings attached.
Call (616) 310-6966 or email [email protected]
Smarter IT, Less Stress, and More Success
Your business deserves IT support and IT services that go beyond quick fixes. We focus on long-term solutions, proactive strategies, and a trusted partnership that keeps your technology running smoothly. Let’s tackle your IT challenges together and build a smarter, more secure future for your business.
Call (616) 310-6966 today or hit the button below to get started. We’re here to make IT work for you!
Company
© 2025 West Michigan Technology Services. Built with MSP Sites. Privacy Policy | Areas We Serve

